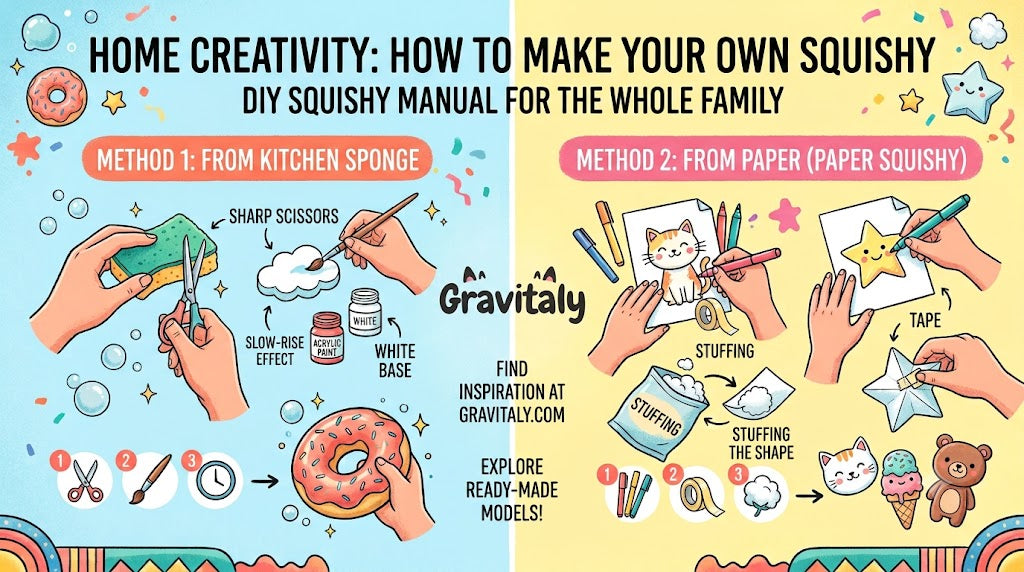
Making a DIY squishy at home is a simple craft project that lets children invent a character, choose the colours and turn an ordinary piece of paper or foam into something wonderfully squeezable.
The easiest option is a paper squishy made from a drawing, clear tape and soft craft filling. Older children can also decorate a clean foam sponge with suitable water-based craft materials. Neither version will behave exactly like a commercially manufactured slow-rising squishy—and that is perfectly fine. The pleasure comes from making something original.
These projects require adult supervision. Homemade squishies are craft items, not safety-tested toys, and should not be given to babies or children under three.
Quick answer: How do you make a homemade squishy?
To make an easy paper squishy:
-
Draw the front and back of a simple character.
-
Cover both drawings with wide clear tape.
-
Cut out the shapes with adult help.
-
Tape the edges together, leaving a small opening.
-
Add soft craft filling.
-
Seal the opening securely.
The project usually takes around 30–45 minutes, depending on the design and how much decoration you add.
Which DIY squishy method should you choose?
Choose the paper method if you want:
-
A simple project using basic craft supplies.
-
Complete freedom to draw your own character.
-
A cleaner activity without wet paint.
-
A lightweight finished craft.
Choose the sponge method if you want:
-
A softer, more foam-like texture.
-
A three-dimensional shape.
-
A project that involves painting.
-
An activity for an older child or adult who can work patiently.
For a first attempt, the paper version is easier and more predictable.
Method 1: Easy paper squishy
A paper squishy is made from two matching drawings, sealed with tape and lightly filled. It will not rise like memory foam, but it creates a satisfying soft pocket that can be gently pressed.
What you need
-
Plain white paper or lightweight drawing paper.
-
Pencil and eraser.
-
Coloured pencils or markers.
-
Wide clear packing tape.
-
Scissors.
-
Polyester craft filling or clean, soft paper tissue.
-
A ruler, optional.
-
A blunt tool for positioning the filling, optional.
An adult should handle sharp scissors and help apply or trim the packing tape.
Do not use food, rice, flour, liquids, beads or other loose fillings. These can leak, attract moisture or create an unnecessary choking hazard.
Step 1: Choose a simple design
Begin with a shape that has a clear outline and no narrow sections. Good first designs include:
-
A dumpling.
-
A slice of toast.
-
A strawberry.
-
A cloud.
-
A star.
-
A round animal face.
-
An ice cream.
-
A smiling planet.
Complicated ears, tails and thin arms are more difficult to cut, fill and seal. Keep your first design approximately the size of an adult hand.
Step 2: Draw the front
Draw the outline in pencil, then add the face, colours and details.
Leave a little space between important details and the outside edge. Part of the border will be covered when the two sides are taped together.
Dark outlines and simple colour areas usually remain clearer after the surface is covered with tape.
Step 3: Make the back
Place a second sheet of paper beneath the first and trace the same outline. Alternatively, fold one large sheet before drawing and cut both layers together later.
The back can repeat the front design or include a different detail. A strawberry might have seeds on the front and a small message on the back. A character could wear a tiny backpack or have a simple pattern behind it.
Just make sure the outside shapes match.
Step 4: Cover both sides with clear tape
Place strips of clear tape over the decorated side of each drawing. Overlap the strips slightly so there are no uncovered gaps.
Smooth the tape gently as you work. Small bubbles are not a problem, but large folds may make the finished squishy difficult to seal.
This step helps protect the drawing and makes the surface more resistant to ordinary handling. It does not make the squishy fully waterproof.
Step 5: Cut out the shapes
Cut around the outline, leaving a small clear border outside the drawing. This border gives you space to join the front and back.
An adult should complete this step for younger children.
Place the two cut shapes together with the drawings facing outwards. Check that the edges align before continuing.
Step 6: Seal most of the edge
Use shorter pieces of clear tape to join the front and back around the outside.
Work slowly and press each section firmly. Leave an opening of approximately 4–5 cm along one straight edge.
Do not seal the opening yet—you still need to add the filling.
Step 7: Add the filling
Tear the polyester craft filling into small, soft pieces and insert them gradually. A blunt pencil end or craft stick can help move the filling towards the corners, but it must not pierce the paper.
Do not pack the squishy too tightly. A lightly filled shape is easier to press and less likely to split at the seams.
Pause occasionally and test the feel. Add a little more only if the centre seems too flat.
Step 8: Close the opening
Once you are happy with the shape, press the open edges together and seal them with clear tape.
Run a finger along every seam and look for gaps. Trim loose tape with adult help, taking care not to cut into the sealed edge.
Your paper squishy is now ready for gentle squeezing.
Method 2: Painted sponge squishy
A clean foam sponge creates a more three-dimensional result. The texture will depend on the sponge, and the finished project should not be described as a true slow-rising squishy unless the foam actually behaves that way.
What you need
-
A new, unused soft foam sponge without a rough scouring layer.
-
A marker for sketching the shape.
-
Sharp scissors or a craft knife for adult use only.
-
Water-based, non-toxic fabric paint suitable for porous material.
-
Soft paintbrushes.
-
Protective paper for the table.
-
An apron or old shirt.
-
A well-ventilated place where the project can dry completely.
Check the paint manufacturer’s instructions before use. “Non-toxic” does not mean edible, suitable for mouthing or appropriate for every age.
Step 1: Choose a rounded shape
Simple shapes work best with foam:
-
A doughnut.
-
A slice of cake.
-
A piece of fruit.
-
A rounded animal face.
-
A cloud.
-
A loaf of bread.
Avoid very thin details because they can tear during cutting or squeezing.
Step 2: Let an adult cut the foam
Sketch the outline lightly on the sponge.
An adult should cut away small sections gradually. Never allow a child to use a craft knife, and do not hold the sponge in your hand while cutting towards it.
Round the edges with small snips rather than trying to remove large pieces at once.
Step 3: Test the paint
Apply a small amount of paint to an unused piece of foam or an area that will become the back.
Allow it to dry and squeeze it gently. If the paint becomes hard, cracks immediately, remains sticky or has a strong smell, do not use it for the project.
Step 4: Apply thin layers
Paint the base colour in a thin, even layer. Heavy paint can fill the foam’s pores and make the finished craft stiff.
Let the first layer dry according to the paint instructions before adding another. Then add the face and decorative details.
Avoid glitter, glued-on eyes, beads, sequins and other small decorations that can detach during squeezing.
Step 5: Allow it to dry completely
Place the squishy in a well-ventilated area and follow the paint manufacturer’s drying time. The surface may feel dry before the inside of the paint layer is ready.
Do not squeeze, store or give the craft to a child while it is damp, sticky or strongly scented.
Important safety guidance
DIY squishies are homemade crafts. They have not been tested to the same standards as toys placed on the market.
Follow these precautions:
-
Provide active adult supervision throughout the project.
-
Adults should handle sharp scissors and cutting tools.
-
Do not give a homemade squishy to a baby or child under three.
-
Do not allow children to bite, lick or sleep with it.
-
Keep all craft materials away from food preparation areas.
-
Use paints and adhesives only according to their labels.
-
Avoid solvent-based products and materials with strong fumes.
-
Keep plastic tape and loose filling away from younger siblings and pets.
-
Check every seam before and after use.
-
Stop using the squishy if paint flakes, tape lifts or filling becomes exposed.
-
Keep the finished craft away from heaters, candles and other heat sources.
-
Wash hands after completing the activity.
If a child has allergies, asthma, sensitive skin or a tendency to mouth objects, choose another craft activity or ask an appropriate healthcare professional about suitable materials.
Why did my paper squishy become flat?
The squishy may need slightly more filling, or the filling may have moved towards the edges.
Open one small section carefully, redistribute the filling and add a little more if necessary. Do not overfill it—the seams should close without tension.
Paper squishies will naturally flatten with repeated use. They are temporary crafts rather than permanent toys.
Why is my sponge squishy stiff?
The most likely cause is too much paint or a product that dries into a rigid surface.
Unfortunately, adding another coating usually makes the problem worse. For the next attempt:
-
Use a softer sponge.
-
Test the paint first.
-
Apply thinner layers.
-
Allow each layer to dry fully.
-
Keep decorative details simple.
The finished texture will always depend on the original foam and the paint used.
How can you make the design look better?
Start with a bold outline
A clear outer shape makes cutting and sealing easier.
Use a limited colour palette
Two or three main colours often look more finished than many competing shades.
Add a tiny highlight to the eyes
One small white dot can make a simple character feel more expressive.
Repeat a pattern
Seeds, sprinkles, stars or small dots can add detail without making the shape difficult to cut.
Give the character a personality
Choose an expression before drawing:
-
Sleepy.
-
Surprised.
-
Cheerful.
-
Grumpy.
-
Shy.
-
Very serious about being a strawberry.
The personality is often what makes a homemade design memorable.
DIY squishy ideas to try
Once you understand the basic method, try creating:
-
A breakfast set with toast, an egg and a strawberry.
-
A collection of weather characters.
-
A family of dumplings with different expressions.
-
A favourite animal.
-
A space set with a moon, star and planet.
-
A seasonal pumpkin or friendly ghost.
-
A tiny paper squishy made as a backpack decoration—not for very young children.
-
Two matching characters for friends or siblings.
Avoid copying protected characters or brand logos if you plan to share, sell or publicly display the design. Creating your own face, colour scheme and personality is more original—and usually more fun.
How should a DIY squishy be stored?
Keep paper squishies in a clean, dry container away from direct sunlight and heat. Do not place heavy objects on top of them.
Sponge versions must be fully dry before storage. If a squishy becomes damp, develops an unusual smell, shows mould, cracks or exposes its filling, discard it.
Homemade squishies are not designed to last indefinitely. Photographing the finished creation is a good way to keep the memory after the craft itself has worn out.
DIY squishy vs a manufactured squishy
A paper or sponge squishy is primarily a creative project. It gives the child control over the character, colours and making process.
A manufactured squishy is designed as a finished tactile toy. Its texture, rebound, seams and surface are produced using specialised materials and manufacturing processes.
When buying one, check:
-
The recommended age.
-
Safety and warning information.
-
Product dimensions.
-
Materials, where provided.
-
Care instructions.
-
Whether small accessories are attached.
-
The condition of the item before every use.
Read our complete guide to choosing the right squishy toy for more help comparing textures, sizes and designs.
Turn the project into a creative afternoon
The finished squishy does not need to look professional. A crooked smile, uneven strawberry seed or unexpected strip of tape is part of the story of how it was made.
Let children make the important creative decisions while adults handle the safety-sensitive steps. You can sketch designs together, invent names for the characters or create a small paper backdrop for them after the squishies are finished.
For days when you would rather skip the cutting, taping and drying, explore Gravitaly’s squishy and sensory toys or discover a ready-made surprise in the Surprise Squishy Box.
GRAVITALY JOURNAL